How to use the withdrawal address whitelist function?

- FAQ

The Withdrawal Address Whitelist function will impose restrictions on coin withdrawals. If this function is activated, you will only be able to withdraw coins and send them to previously saved whitelisted withdrawal addresses.
The instructions for using this function will cover the following points:
- Who will be able to use the whitelist function?
- How to switch on the withdrawal address whitelist function?
- How to add withdrawal addresses to the whitelist?
- How to delete withdrawal addresses from the address list?
- How to delete whitelist withdrawal addresses that have already been added?
- How to change the activation time for the whitelist?
- How to switch off the withdrawal address whitelist function?
Who will be able to use the whitelist function?
- Users from HTX (Web), HTX Pro (App) will be restricted from withdrawing coins once the whitelist function is turned on. API users will not be affected, and they can still use the defined withdrawal addresses in API documentation.
- Users can activate, deactivate, or add withdrawal addresses to their whitelist on HTX (Web), HTX Pro (App version 6.4.5 and above).
Note:
It will take a few effective days (which can be set by yourselves as the activation time) for the whitelist function to be effective. How to change the number of effective days will be covered in these instructions.
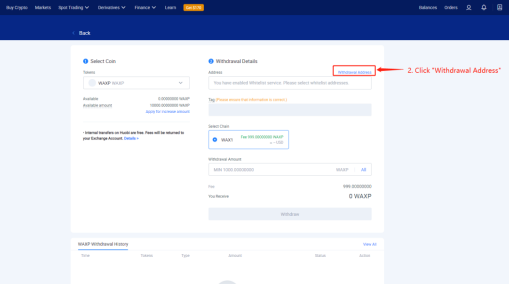
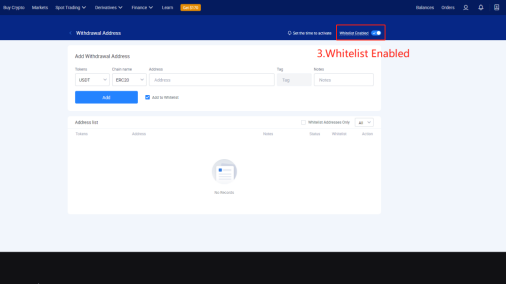
How to switch on the withdrawal address whitelist function?
1. Click [Exchange Account (Deposit and withdrawal)] on [Balances]

2. Click [Withdraw], then click [Withdrawal Address].

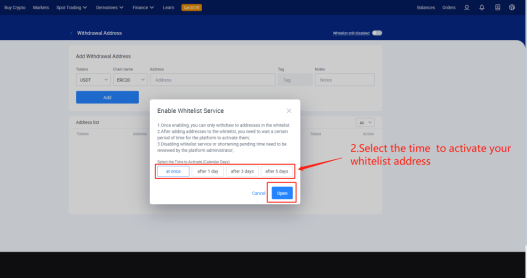
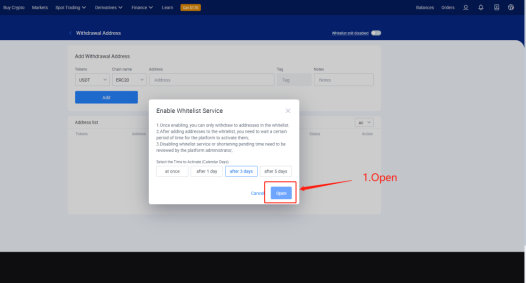
3. Click [Whitelist still disabled] to open the function, and you will need to select the time required to activate your whitelist address. For example, if you choose “after 3 days”, you need to wait three days before you can withdraw coins and send them to the whitelisted address.

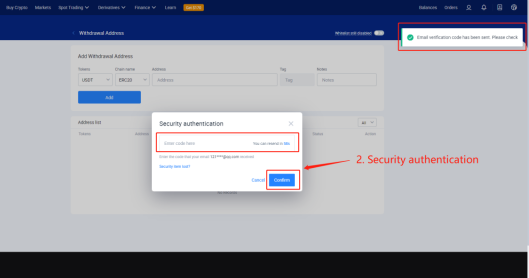
4. Click [Open]. You will need to pass the [Security authentication]. Then your whitelist function will be enabled.
Note:
You can only be able to withdraw coins and send them to effective withdrawal addresses on the whitelist. You will not be able to withdraw coins and send them to other addresses.
How to add withdrawal addresses to the whitelist?
After the whitelist is enabled, there are two ways to add the withdrawal whitelist address.
1. Adding whitelisted addresses directly:
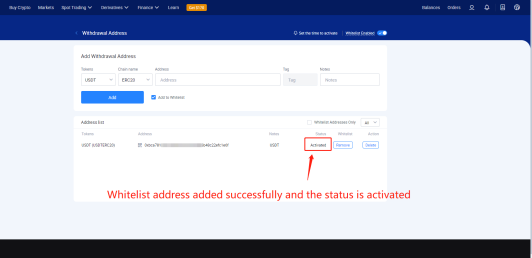
Add withdrawal address information, and click [Add to Whitelist], then click [Add]
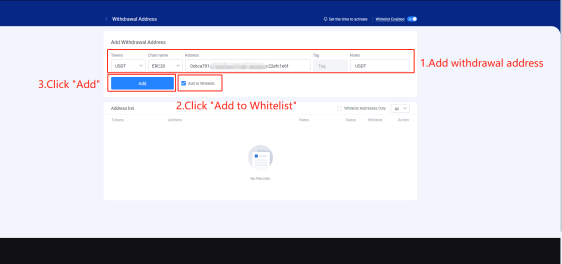
Wait for set effective days for validation; then, the whitelisted address will be added successfully.
Note: If you do not tick “Add to Whitelist”, your added address will remain a normal address, and you will not be able to withdraw coins directly.
2. Adding saved normal addresses to the whitelist:
Add withdrawal address information, and click [Add] to add 1 normal address.
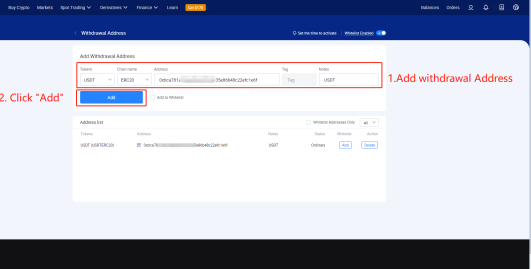
Then click [Add] to add the normal address to your whitelist

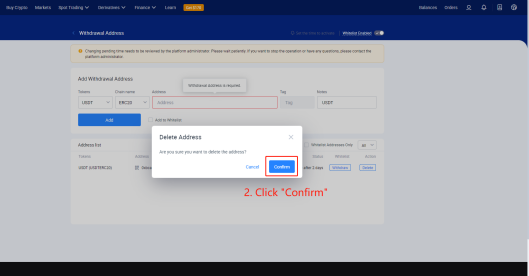
Note: You can withdraw your application to add a whitelisted address when the status is pending, by clicking [Withdraw] and then clicking [Confirm]
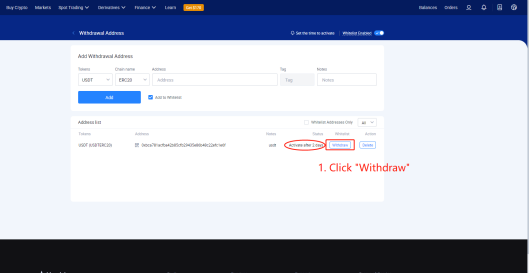

How to delete withdrawal addresses from the address list?
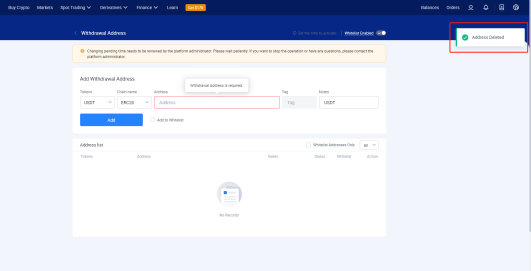
Within the address list, click [Delete] and then click [Confirm]. The withdrawal addresses will be deleted successfully.

How to cancel whitelist withdrawal addresses that have already been added?
Within the withdrawal address list, click [Remove], and then click [confirm].

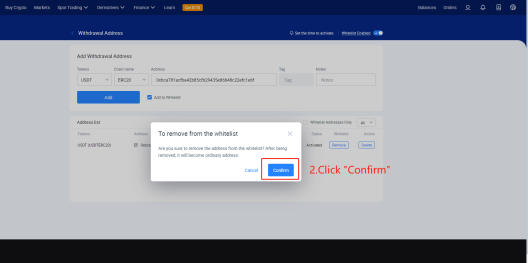
After confirmation, you will not be able to withdraw coins and send them to that address.
How to change the activation time for your whitelist?
1. Click [Set the time to activate]. There will be a pop-up window.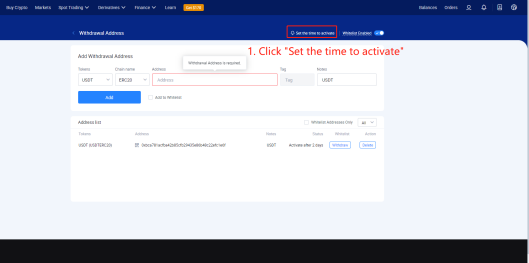
2. Select the time to activate, and click on “Update settings”
Note:
1). If the new effective time is longer than the old one, for example, changing from 1 day for validation to 3 days for validation, the effective date will be updated right after you pass the second verification process. If the new effective date is shorter than the old one, you will need to wait for approval from the platform admin after the second verification.
2). The time required for obtaining approval will take a few minutes or days according to different users’ cases. You will not be able to change effective data or switch off the whitelist function while you’re.
3). The updated effective time is only effective on the newly added whitelisted addresses.
How to switch off the whitelist function?
1. Click [Whitelist Enabled], and then click [Confirm to close]
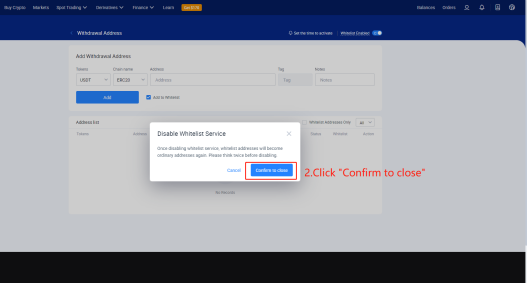
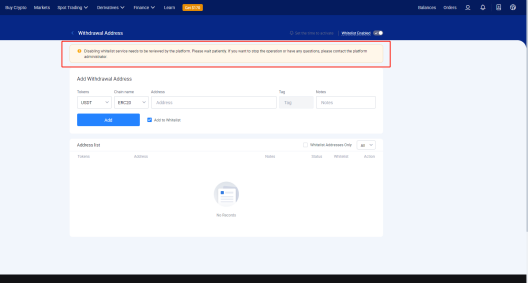
2. Disabling the whitelist service needs to be reviewed by the platform. Please wait patiently. If you want to stop the operation or have any questions, please contact the platform administrator.
Note:
Switching off the whitelist function will convert saved whitelisted addresses to normal addresses. You will need to add the addresses to your whitelist again when you switch on the whitelist function next time.


